Table of Contents
Team CoreELEC recommends running from (μ)SD Card / USB Flash Drive!
Device specific notes
The instructions bellow are for generic ARM based devices reported to work with CoreELEC.
End user support for these devices is provided by the CoreELEC User Support Forums.
Preparation
Requirements
- Personal Computer with Internet Access
- Memory Card Reader
- Image Writing Software
- Toothpick or paperclip (needed on some models to press the reset button)
Image writing software
| Application | Function | Linux | Mac | Windows |
|---|---|---|---|---|
| balenaEtcher | Bootable Media Creator | X | X | X |
| UNetbootin | Bootable Media Creator | X | X | X |
| USBImager | Bootable Media Creator | X | X | X |
| ddrescue / ddrescuegui | Disk Utility | X | ||
| Disk Utility | Disk Utility | X | ||
| Rufus | Bootable Media Creator | X |
Linux command line
gunzip -c image.img.gz | dd of=</dev/path/to/bootmedia> bs=1M conv=fsync
Creating Boot Media
Table 1: Board & SoC status within CoreELEC development cycle
| CoreELEC | BOARD | SoC |
|---|---|---|
| 19.x STABLE | G12A | S905X2 |
| 19.x STABLE | G12B | S922X, A311D |
| 19.x STABLE | GXL | S905D, S905X, S905W, S905L, S905M2, S805X, S805Y |
| 19.x STABLE | SM1 | S905X3 |
|
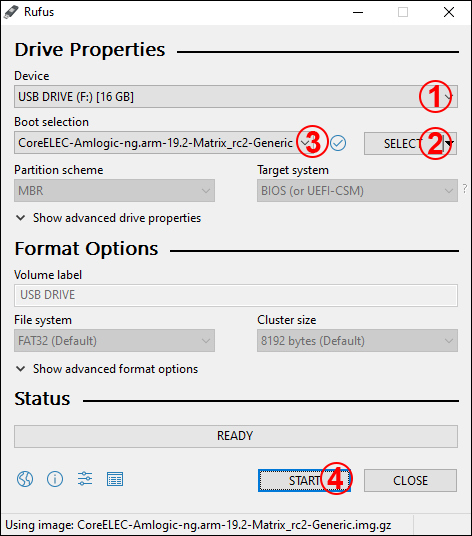
Use the CoreELEC Download Helper to download the desired CoreELEC Edition (Stable, Nightly) onto a personal computer, then use the image writing software to create a bootable (μ)SD Card / USB Flash Drive (boot media). The Download Helper assists in selecting the DTB for use with the selected device. Make note of the DTB name, it will facilitate the nesxt step (Choosing a Device Tree). Downloaded image: CoreELEC-Amlogic-ng.arm-19.2-Matrix_rc2-Generic.img.gz If required, first extract the image.
Once completed, the (μ)SD Card / USB Flash Drive capacity should show 512MB. The remainder of the drive will be initialized during first boot and will become available as storage partition for CoreELEC user data. |
Choosing a Device Tree
Table 2: What to look for when distinguishing between a generic and a device specific device tree
| Device | SoC | RAM | Device Tree | ||
|---|---|---|---|---|---|
| Generic dtb | | S905X3 | 4G | sm1_s905x3_4g_1gbit | |
| Device specific dtb | Odroid C4 | | | sm1_s905x3_odroid_c4 |
|
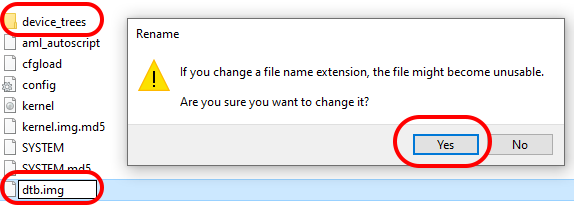
Browse to the device_trees folder on the boot media, and copy the .dtb image file for the device that will be running CoreELEC onto the main (root) folder of the (μ)SD Card / USB Flash Drive, then rename it to dtb.img The list is for reference only and far from complete. If your device is not listed by name, try all of the dtb matching the device hardware configuration and choose the one working best with your device. If some of the devices functionality is missing, like for example BlueTooth or HDR, and the feature is supported by the hardware, Team CoreELEC might be able to help you in the CoreELEC User Forums. |
Booting CoreELEC
To boot CoreELEC for the first time, one the following techniques can be used:
TV box
- Android APK method: Reboot to LibreELEC reportedly works with CoreELEC. Insert boot media and run the app, then follow the onscreen instructions. The device should reboot into CoreELEC.
- Terminal Emulator method: boot to Android, insert boot media, install Jackpal's Terminal Emulator for Android. Open a terminal and type reboot update, followed by the [Enter] key. The device should reboot into CoreELEC.
- Reset Button method: also called the “toothpick method”. Disconnect the power supply, insert boot media, push and hold the reset button while connecting the power. Wait until the CoreELEC logo appears, then release the reset button. NOTE: the reset button can be hidden inside the AV port.
- Menu Button method: this method has been reported to work with some devices. Disconnect the power supply, insert boot media, then push menu button of the remote control, and connect the power while holding the menu button. Wait until the CoreELEC logo appears, then release the button.
- Recovery method #01: boot into Android, insert boot media and choose reboot to recovery. The device should boot into CoreELEC.
- Recovery method #02: if the device has an “Update” app pre-installed, open it, insert boot media, and choose any ZIP file in the app for update. The device should now boot into CoreELEC.
- Recovery method #03: enable adb and issue adb reboot update, followed by [Enter].
SBC
- Khadas VIM: insert boot media and start in Upgrade Mode. The device should now boot into CoreELEC.
- Odroid: insert boot media, unplug eMMC, then power on. The device should now boot into CoreELEC.
Some MiNiX devices
- Power button Method: insert boot media, plug in the power cord, then hold power button for a minimum of 6 seconds or until the CoreELEC logo appears.
- methods are listed from easy to complex. Please try each method before seeking support.
- on certain devices only one method is possible.
- on some devices, only one of the USB slots allows for booting the device. Please try each USB slot before seeking support.
- some devices only boot from (μ)SD Card while others only accept a USB Flash Drive.
Remote Control Unit
This section can be skipped if the remote works “out of the box”
|
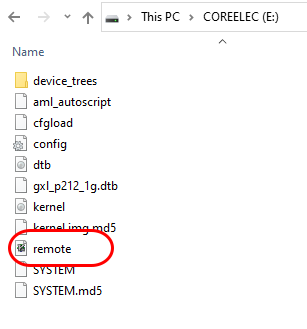
CoreELEC natively supports a large selection of Infrared Remote Control Units via the NEC Infrared Transmission Protocol. If CoreELEC does not respond as expected to a functional factory remote that powers the device on and off:
The remotes repository has a Wiki which combines troubleshooting tools and tips with a comprehensive knowledge base. |
Vacuum Fluorescent Display
These steps are for devices with a Vacuum Fluorescent Display similar to the one in the picture
|
Currently only 1 device is known to require a custom dtb.img: the A95X-R2. The dtb.img for this device can be found in the device_trees folder of the boot media.
References
[1] ensure boot media is compatible with device (eq: a device with a 16Gb (μ)SD Card slot might be unable to boot from a 32Gb (μ)SD Card). 8Gb should be recognized by the vast majority of Android TV Boxes.


