CoreELEC for Khadas
These instructions explain how to install and boot CoreELEC on supported Khadas SBC's from µSD Card by use of a Windows PC. The instructions can easily be adapted for other Operating Systems.
Supported devices
| Amlogic-ng | Amlogic-ne |
|---|---|
| VIM1 | VIM4 |
| VIM3 | VIM1S |
| VIM3L |
Prerequisite
VIM1 & VIM3/3L require the Android bootloader.
Please ensure Android firmware is installed prior to proceeding.
If Android is not pre-installed
- Download the latest Khadas VIM Android Firmware
- Install with Amlogic USB Burning Tool
Requirements
- Personal Computer with Internet Access
- Memory Card Reader
- A compatible Class 10 (USH 1/V 10) or better μSD Card
- Image Writing Software
Image writing software
| Application | Function | Linux | Mac | Windows |
|---|---|---|---|---|
| balenaEtcher | Bootable Media Creator | X | X | X |
| UNetbootin | Bootable Media Creator | X | X | X |
| USBImager | Bootable Media Creator | X | X | X |
| DDRescue / DDRescue-GUI | Disk Utility | X | ||
| Disk Utility | Disk Utility | X | ||
| Rufus | Bootable Media Creator | X |
Preparation
- Visit the CoreELEC website
- Select a version to download
- The Download Helper will pop up
- Select the VIM device
- Download the image
- Write the image to μSD Card
Amlogic-ng only:
- Copy the device tree from the device tree folder on the µSD card to the root of the µSD Card
- Rename the device tree dtb to dtb.img
Installation
| Device | Edition | DTB | SoC | Distribution |
|---|---|---|---|---|
| VIM1 | 2G | gxl_p212_2g_kvim.dtb | S905X | Amlogic-ng |
| VIM3 | 2G/4G | g12b_a311d_khadas_vim3.dtb | A311D | Amlogic-ng |
| VIM3L | 2G | sm1_s905d3_khadas_vim3l.dtb | S905D3 | Amlogic-ng |
| Device | Edition | DTB | SoC | Distribution |
|---|---|---|---|---|
| VIM4 | 8G | t7_a311d2_khadas_vim4.dtb | A311D2 | Amlogic-ne |
| VIM1S | 2G | s4_s905y4_khadas_vim1s.dtb | S905Y4 | Amlogic-ne |
VIM1 & 3/3L ONLY
Don’t use a PC as the USB-Host to supply the electrical power
Multi-Boot may fail!
VIM1
- Insert the µSD Card
- Power ON the SBC
- Long press the POWER key without releasing it
- Short press the 'Reset' key and release it
- Count 10 seconds, and release the POWER key to enter into Upgrade Mode
VIM3/VIM3L
- Insert the µSD Card
- Power ON the SBC
- Long press the POWER key without releasing it
- Short press the ‘Reset’ key and release it
- Count 2 to 3 seconds, then release the POWER key to enter into Upgrade Mode
- The sys-led turns ON when entering Upgrade Mode
VIM4/VIM1S
VIM4 & VIM1S require Amlogic Vendor Kernel 5.4, which is included with Amlogic-ne
Download CoreELEC-Amlogic-ne.arm-20.0-Nexus_xxx-Khadas_VIMxx.img.gz
- Write to µSD Card
- Insert the µSD Card
- Power ON the SBC
CoreELEC should boot automatically
Amlogic-ne download page
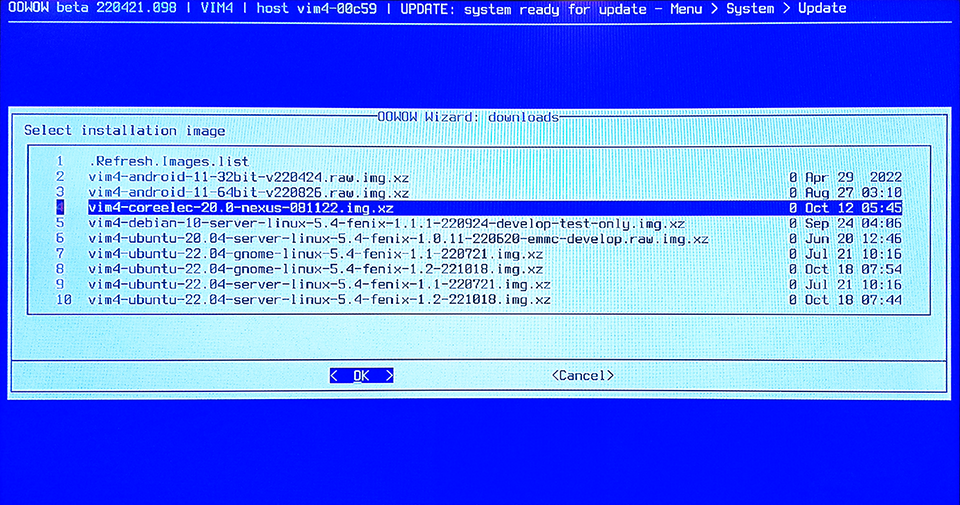
With OOWOW
- Only compatible with VIM4/VIM1S
- boot into OOWOW and use the wizard
- select CoreELEC from the download list
Install CoreELEC to eMMC
For situations where it is desirable to run CoreELEC in dual boot with Android or as a stand-alone JeOS:
This feature is currently unavailable for Amlogic-ne. Please use OOWOW instead.
Device Support
For support unrelated to CoreELEC, please refer to the Khadas User Support Forums.
Notes
The above instructions also can be used to create a bootable USB Flash Drive.

