CoreELEC for Odroid
These instructions explain how to install, and boot, CoreELEC on supported Odroid SBCs from µSD Card, by using a Windows PC. The instructions can easily be modified for other Operating Systems.
Supported devices
- Odroid N2
- Odroid N2+
- Odroid C4
- Odroid HC4
There are 2 methods of installation: external media (SD Card, USB Flash Drive,…), or eMMC. Both methods are covered in this document.
Requirements
- Personal Computer with Internet Access
- Memory Card Reader
- eMMC Module Writer (required for C4, optional for N2, N2+)
- eMMC Module (optional for N2, N2+, C4)
- USB Charge and Sync Cable (optional for N2, N2+)
- A compatible Class 10 (USH 1/V 10) or better μSD Card.
- Image Writing Software
Image writing software
| Application | Function | Linux | Mac | Windows |
|---|---|---|---|---|
| balenaEtcher | Bootable Media Creator | X | X | X |
| UNetbootin | Bootable Media Creator | X | X | X |
| USBImager | Bootable Media Creator | X | X | X |
| DDRescue / DDRescue-GUI | Disk Utility | X | ||
| Disk Utility | Disk Utility | X | ||
| Rufus | Bootable Media Creator | X |
Install to μSD Card
These instructions can also be used for a USB Flash Drive.
- Visit the CoreELEC website
- Select a version to download
- The Download Helper will pop up
- Select Skip that and just show me all download options
- Download the corresponding image
- write the downloaded image to μSD Card
| SBC | Edition | SoC | Image |
|---|---|---|---|
| Odroid N2 | 2G/4G | S922X | CoreELEC-Amlogic-ng.arm-xxxx-Odroid_N2.img.gz |
| Odroid N2+ | 2G/4G | S922X | CoreELEC-Amlogic-ng.arm-xxxx-Odroid_N2.img.gz |
| Odroid C4 | 4G | S905X3 | CoreELEC-Amlogic-ng.arm-xxxx-Odroid_C4.img.gz |
| Odroid HC4 | 4G | S905X3 | CoreELEC-Amlogic-ng.arm-xxxx-Odroid_HC4.img.gz |
Once the image is transfered to μSD Card, the device is Ready To Boot (RTB), meaning no Device Tree Blob (DTB) needs to be copied.
Boot from μSD Card
Odroid N2, N2+, C4 & HC4
- Ensure the SBC is powered OFF
- N2, N2+ only: if present, detach eMMC module
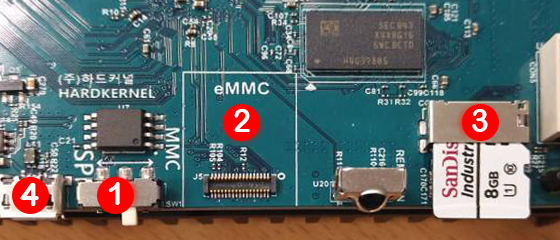
- N2, N2+ only: ensure boot select switch (1) set to MMC
- Insert the bootable μSD Card into the SBC's μSD slot (N2, N2+, C4, HC4)
- Power SBC ON
NOTE (N2, N2+ only): when booting from USB, the switch has to be set to SPI. Select the CoreELEC menu entry to boot.
Boot from eMMC Module
Never add or remove the eMMC module, or toggle the boot select switch, while the device is powered on. Doing so may cause irreversible hardware damage.
eMMC Module Compatibility
Hardkernel eMMC Module compatibility reference chart
Odroid N2, N2+
|
There are 3 options listed to install CoreELEC onto the N2/N2+ eMMC Module.
| Option | Type | Notes |
|---|---|---|
| A | eMMC Module Writer | Bundle module writer with other purchase to save on shipping |
| B | μSD Card & SSH | Requires a functional LAN |
| C | USB OTG | Requires a more elaborate setup |
The Odroid N2 has a Boot Select Switch (1). When the switch is set to SPI, the CPU will fetch the Petitboot bootloader from SPI flash memory. When the switch is set to MMC, the bootloader from the eMMC module, USB Flash Drive, or μSD Card will be fetched by the CPU. The CPU will fetch from μSD Card if the eMMC module is detached or lacking a bootloader.
Petitboot
This information only pertains to eMMC migration options B & C, and to devices dual-boot betweeb CoreELEC and another OS.
Petitboot (PB) version 2022-03-17 or better is required for use with CoreELEC.
This is also the first edition including support for compressed Amlogic Multi-DTB.
Please refer to the Hardkernel User Support Forums for help with Petitboot.
Corrupted Petitboot Flash
Occasionally Petitboot can become corrupted. In such situations, prior to re-flashing Petitboot, it is recommended to clear the dedicated PB flash module.
- First enter these commands into the PetitBoot shell:
flash_eraseall /dev/mtd0
flash_eraseall /dev/mtd1
flash_eraseall /dev/mtd2
- Next follow the How to Recover or Upgrade Petitboot instructions:
- Use Petitboot Recovery Image dev.20211112
- Update to PetitBoot 20220317 or better
OS Booting
There are 3 ways to boot CoreELEC on Odroid N2(+)
1. Direct booting
Used with: μSD Card, eMMC module.
- Power off ODROID
- Toggle the boot mode switch to MMC boot mode
- Power on ODROID
2. Booting via Petitboot
Used with: USB Flash Drive, USB HDD/SSD.
- Power off ODROID
- Toggle the boot mode switch to SPI boot mode
- Power on ODROID
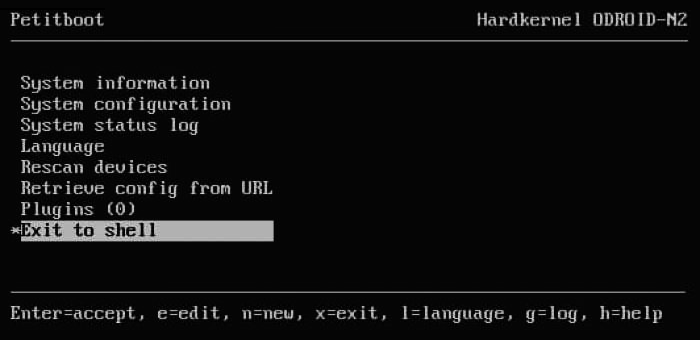
- Select 'Rescan devices'
- Select boot partition
NOTE: it can take up to 30 seconds for an SSD drive to show up.
3. Set autoboot
- Power off ODROID
- Toggle the boot mode switch to SPI boot mode
- Power on ODROID
- Select 'Rescan devices'
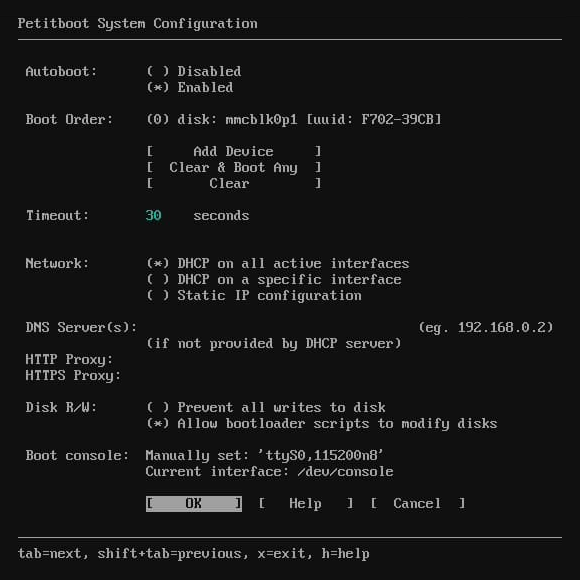
- Select 'System configuration'
- Set 'Autoboot' (*) Enabled
- Set 'Boot Order'
- Clear
- Add Device
- Set 'Timeout' (10 seconds or more recommended)
- OK
- Press Ctrl + Alt + Delete
Option A: eMMC Module Writer
- Download the correct CoreELEC image
- Attach the eMMC module to the eMMC Module Writer
- Insert eMMC combo into an available PC USB slot
- Write the downloaded image to USB mounted eMMC
- Ensure SBC is powered OFF
- Attach bootable CoreELEC eMMC module (2)
- Ensure boot select switch is set to MMC (1)
- Power SBC ON
Option B: μSD Card & SSH
- Ensure the SBC is powered OFF
- Toggle boot select switch to SPI position (1)
- Attach eMMC module (2)
- Insert bootable CoreELEC μSD Card (3)
- Power SBC ON
- Select CoreELEC from Petitboot menu
Once CoreELEC has booted:
- SSH into CoreELEC
- Enter:
installtoemmc
Once the installation script is finished:
- Power SBC OFF
- Toggle boot select switch to MMC (1)
- Remove μSD (3)
- Power SBC ON
Option C: USB OTG
Enabling USB OTG allows the Odroid N2(+) SBC to be used as a Memory Card Reader
This feature is enabled from the Petitboot shell
Requirements
- USB Charge & Sync Cable
- USB keyboard
- Personal Computer
- Petitboot
Preparation
- Connect SBC to a display
- Ensure the SBC is powered OFF
- Ensure boot select switch is set to SPI (1)
- Attach eMMC module
- Connect a USB keyboard
- Power SBC ON
Petitboot menu
- Select
Exit to shell - Insert the USB Cable into an available USB port on the PC, and the SBC's OTG port (4)
To share the eMMC module as USB Storage enter this command in the PB shell:
ums /dev/mmcblk0
- Wait for the PC to detect the eMMC module
- Write the CoreELEC image for Odroid N2/N2+ to eMMC
Once the image is successfully written, turn off USB Mass Storage mode (ums). The eMMC module will safely unmount.
- Enter the following command in the PB shell:
ums
- Remove USB Cable
- Power SBC OFF
- Ensure boot select switch is set to MMC (1)
- Power SBC ON
NOTE: The USB OTG method can also be used to install CoreELEC onto USB or SD card.
Path substitutes
| Device | Command |
|---|---|
| eMMC module | ums /dev/mmcblk0 |
| μSD Card | ums /dev/mmcblk1 |
| USB Storage Device | ums /dev/sda |
| ums /dev/sdb |
Blank display
This random behavior can occur when using older versions of Petitboot in combination with certain television sets.
Scenarios
New installation
- After choosing CoreELEC from the Petitboot menu, some displays may remain blank. After about 1 to 2 minutes, the Petitboot menu shows again. CoreELEC went through the first stage of its installation, expanded the storage partition and rebooted. Selecting CoreELEC again from the Petitboot menu, results in another blank display. Power cycling the display (turning the display off and back on), or cycling the video input source, brings up the CoreELEC interface.
Existing installation
- While CoreELEC boots perfectly fine with the boot switch set to EMM, in Petitboot mode (SPI) some displays may remain blank while CoreELEC is booting or has booted. Waiting for about one minute till CoreELEC has booted, then power cycling the display (turning the display off and back on), or cycling the video input source, brings up the CoreELEC interface.
Solution: Petitboot update
Perform a Petitboot firmware update.
- Download Petitboot image
- Rename image to
spiboot.img - Copy
spiboot.imgto the root of a μSD Card - Power Odroid N2/N2+ OFF
- Insert μSD card
- Toggle boot mode switch to SPI
- Power Odroid N2/N2+ ON
NOTE: Petitboot can also be updated by running pb-update in the Petitboot shell.
Odroid C4
An eMMC Module Writer is required to write a bootable eMMC module
- Download the corresponding image
- Write the downloaded image to USB mounted eMMC
- Ensure SBC is powered OFF
- Attach bootable CoreELEC eMMC module
- Power SBC ON
Odroid HC4
- No eMMC module or connector is present
- The SBC has a 16Mb EEPROM Chip with Petitboot preinstalled
- Petitboot can boot from μSD Card, USB Flash Drive, HDD, or SSD
Device Support
For support unrelated to CoreELEC, please refer to the Hardkernel User Support Forums.


